How To Use Modloader in GTA San Andreas, Vice City, and GTA III — Full Ultimate Guide
How To Use Modloader (Folder) ?


ModLoader , currently the most beloved and used mod by users.
In this tutorial, I'll try to show you everything from the most basic to the most advanced, things you probably never imagined possible. Yes, Mod Loader isn't just a folder where you put mods.
This tutorial is safe and high-quality because I (Junior_Djjr) have been using ModLoader since 2012 and was one of its main testers, so I understand how it works well. The tutorial was even reviewed by LINK/2012, the creator himself, to avoid misinformation. So, you can trust me.
THE TUTORIAL IS LARGE .
Of course, you don't need to read the whole thing, but try to read as much as you can, as it will be useful for you. At least the "Basics" and " Priority " sections.
EVERYTHING IS UPDATED IN MODLOADER VERSION V0.3.7
Basics
How to install mods
“modloader/infernus.txd” – WRONG
“modloader/.data/infernus.txd” – WRONG
“modloader/some folder/infernus.txd” – CORRECT
“modloader/any folder/as many folders as you want/infernus.txd” – CORRECT
Detail: If the folder name is in Russian or Chinese etc. and your PC is not (almost all of you reading this are Brazilian, right?), it will bug, rename the folders to normal letters.
Tip on how to quickly uninstall mods: By putting a period and a space (".") at the beginning of the folder name, that folder will not be loaded by ModLoader. Simple as that!
How to install readme lines
Mod Loader is definitely a lazy person's paradise. You can even leave .txt files with manual installation lines (like " install this line in your handling.cfg ") and Mod Loader will read the .txt and install it for you! Just leave the .txt file there inside any folder. (Great for installing vehicles!!!)
The .txt file size limit to be read from version v0.2.5 is 60 KBs, above that ModLoader will ignore.
How to know what Mod Loader supports
Mod Loader currently supports almost everything, generally you don't need to worry about it, but there are always exceptions, so:
“ Modloader.data/plugins/gta3 “
Inside this folder there are .md files, you can open them with notepad (right click > open as).
Open for example std.data.md , below is a translated print:
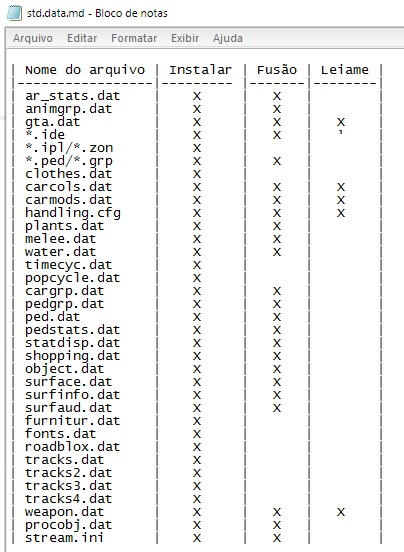
(the print was taken from version v0.2.4)
In this case, “merge” would be the 2 or more files coming together into one, and “readme” would be reading and installing the lines from these files directly from a .txt that usually comes with the mod.
As you can see, Mod Loader currently replaces (or rather, installs/loads) all types of data files.
The other .md files have other details about installation, I will mention the important details here:
About installation
It's true that in Mod Loader all you have to do is put the mod's contents in a folder, but in certain cases you need to leave it in specific forms.
Generally you have to leave the file inside the folder with the path of the folder or file where it goes , so that the Mod Loader knows where the correct place to install is, see:
Installing Cleo Mods
Mod Loader does load cleos mods installed in any way in any folder, but it is recommended to install them inside a cleo folder , as cleos mods generally use third-party files, if it is outside a cleo folder it will not find the files.
For example “modloader/no matter/ cleo “, then the cleo mod will work without problems.
(it has been reported that files like .mp3 are not being loaded inside the Mod Loader even if it is inside a cleo folder, if you have this problem, install it manually in the cleo folder)
Some mods come for example with an “Audio” folder outside the cleo folder with sound files inside, believe it or not, you can normally install these folders in Mod Loader and the cleo mod will still find and load the file (Mod Loader is magic, I didn’t even believe it when LINK/2012 told me that).
Installing sprite files
Sprite files are .txd files inside the “models/txd” folder , they are usually images for scripts, minigames or loadscreens etc.
You MUST install these .txd files inside a specified folder. In this case: “modloader/some mod /txd ”, only then will Mod Loader know that it is a .txd file of sprites and not models (gta3.img etc).
Warning: DO NOT install .txd to .img files (e.g. map objects, cars, peds, weapons) into a folder called “txd” in ModLoader, otherwise ModLoader will load that file in sprite form and cause issues like textures not working!
Installing data files
Generally you can install all of them either way, but:
Decision files (.ped/.grp) – They must be inside a “*decisionallowed” folder, for example: “modloader/any name/ decisionallowed ”.
Non-original game .IDE or .IPL files (added) – Must have loading lines installed (gta.dat).
It is recommended NOT to edit your original gta.dat – For best results when merging gta.dat files, always leave your “data/gta.dat” completely original and place new gta.dat files (or lines of them) inside the Mod Loader. I repeat: Do not edit your gta.dat files from the data folder! Leave everything in the Mod Loader. (This is also recommended for other data files, not just gta.dat!)
Important: It is recommended NOT to install handling.cfg, vehicles.ide and other files, as Mod Loader does not merge data files with .txt!!!
Let's say you've installed a car pack that contains the handling.cfg, vehicles.ide, carcols.dat, and carmods.dat files. Now you want to install a new car over that car pack. So, you'll leave the car's readme in a folder for Mod Loader to automatically read. The problem is that for Mod Loader, handling.cfg (and other data files) will always have higher priority than .txt files!
So, whatever it is, it won't be possible to use a handling.cfg while also installing lines per .txt. This applies to any data file. LINK/2012 told me that fixing this is complicated, so the "bug" persists until the current version.
Detail: This only applies to fusions of identical lines, in the case of using gta.dat or any .txt with a line for gta.dat there is no problem, in this case the Modloader will simply add the .txt line to your gta.dat without any problems.
Installing IMG files
Any type of file that goes inside any .img, you can install normally too, but:
New clothes files (added and not replaced) need to be inside a folder named “player.img” , for example: “modloader/any/ player.img ” ( NOT ACCEPTABLE “modloader/player.img” nor “modloader/clothes/player.img/clothes” ) and then add your clothes inside this folder.
This also applies to the coach.dff and coach.txd clothes files, as there is a bus with the same name, so the modloader needs to differentiate the bus from the clothes, and to do this, just place it in a “player.img” folder.
This also applies to the coach.dff and coach.txd clothes files, as there is a bus with the same name, so the modloader needs to differentiate the bus from the clothes, and to do this, just place it in a “player.img” folder.
Nodes#.dat files must also be inside a folder named after the .img, like “modloader/whatever/ gta3.img/nodes#.dat ” (again: “modloader/gta3.img” is not acceptable)
Installing an entire .img is not a problem either, just place for example a player.img inside the Mod Loader and everything will load normally (if the .img is new, it needs a line in the gta.dat, which, again, you can do by creating a .txt file with the line instead of replacing your gta.dat, as explained in the “Installing data files” section)
Installing audio files
Audio mods usually come in a ready-made file or are separated into folders for you to just put in the Mod Loader, mainly because the Mod Loader corrects the audio files leaving them without artifacts, so currently sound mods use this benefit and at the same time can publish all separate files to reduce the download weight and ease installation.
Anyway, if you downloaded audio mods with manual installation (coming with .wav files), follow the steps:
“(SFXPak_Name)/Bank_(X)/sound_(Y).wav”
Example:
“modloader/my sounds /GENRL/Bank_007/sound_001.wav”
And so this file sound_001.wav will be installed in GENRL, in bank 007.
The audio file MUST be in the format: Mono PCM 16 bits , if not, use some program to convert it. (the warning that it was not loaded will be inside the Modloader.log)
To date, Mod Loader does not install music files (.ogg radio files, etc.), it only installs with the music files already compiled and not the .ogg files separately.
Installing ASI files
.asi files that require additional files may cause incompatibility (the files will not be found). For example, several mods, such as those by Ryosuke839 and Alexander Blade, may be missing.
Usually, you just need to leave the .asi file in ModLoader (which is better, since you have control over the mod's loading), but its files in your GTA folder (outside of ModLoader). This way, the mod will load normally and find the necessary files. This works with mods like Ryosuke's Bullet / Bullettrace .
Usually Mod Loader automatically warns of an incompatible .asi with an on-screen message when clicking on the GTA SA .exe.
Installing COL files
(super important to know!)
There are limit adjusters that increase the .COL file limit, but I was informed by LINK/2012 that this is not recommended at all, as it breaks the game. The Open Limit Adjuster itself doesn't have this limit increase because of this. Update: fastman92 limit adjuster can increase the limit without crashing.
SO HOW TO INSTALL .COL WITHOUT REACHING THE LIMIT?
And here comes Mod Loader once again:
Place the .col file in any folder within Mod Loader, for example: “modloadersomefolderothertest.col”
Create a .txt file inside the “some folder” folder and leave inside it:
COLFILE 0 other/test.col
Ready!
To load from any folder (you don't need a specific one), use:
COLFILE 0 DATA/MAPS/outratest.col
COLFILE 0 DATA/MAPS/outratest.col
Do this with all the necessary .col files (they can all be in the same folder and in the same .txt, the .txt is just to simulate a readme)
If in doubt, you can even provide the entire path, for example:
COLFILE 0 modloader/somefolder/other/test.col
Note: When the .col limit is reached, it gives the crash “0x015632B0” or “0x0040FB80″(?) ( see Crash List )
In-game mods update
Mod Loader doesn't update any script mods in-game , for a number of reasons. It's not good for the game to do so; it can cause bugs, crashes, memory leaks, etc., so Mod Loader doesn't do this.
Handlings are indeed updated within the game, but they are only updated if you use IndieVehicles , as the cars actually need to be recreated for them to gain the new handling, so if you want to edit a handling without leaving the game, you can, but with each update you will have to spawn a new car for the new handling to be added to it, having IndieVehicles installed.
Are you having doubts about installing a certain file and haven't found any explanations here in this post?
Don't panic , install it anyway, I just listed the file types that need to be installed differently, everything else can be installed normally without worrying about the folder names.
Modloader.ini
In the file “ modloader/modloader.ini ” you can configure the installation of your mods, it is an extremely important and indispensable file for you to control your installed mods.
Usually, this file may not have any explanatory text if you already had Mod Loader and installed an update. If you want the explanatory texts again, you can find them by opening the file “modloader/.data/modloader.ini.0” with notepad. Inside there will be small explanations. I will explain them better here:
.Config
Starting with the basics.
Under “ [Profiles.Default.Config] ” we have:
“ IgnoreAllMods ” – Set “true” to ignore all mods, basically it will disable all mod loading.
“ ExcludeAllMods ” – Set “true” to not load all mods except those listed in “.IncludeMods”.
(there are 2 more settings, I will talk about them in the “ Profiles “ section)
(it is essential that you know!!!)
Imagine you have two identical files (but from different mods) installed at the same time in ModLoader, how will it work?
ModLoader will load one of them based on the order the file is in, so it often won't load the file you want, so you have to set the priority of the mod folder you prefer to be loaded instead of the others that replace the same file.
You can do this by pausing the game and going to the " Mod Settings " options menu , but I recommend learning how to modify the "modloader.ini" file, as changing mod priorities during gameplay can cause crashes, and some mods require prioritizing before starting the game. Therefore, use "modloader.ini":
Under “ [Profiles.Default.Priority] ” in modloader/modloader.ini, you can put the name of your folders followed by a number indicating their priority, simple.
For example:
[Profiles.Default.Priority]
Car pack = 10
New cars = 20
This way the “New Cars” folder will have more priority (more important) than the “Car Pack” folder.
In the example, I downloaded a car pack, created a folder “modloader/ Car Pack ” and placed my car pack there.
I downloaded some new cars that I liked, so I created a folder “modloader/ NewCars ” and installed my new cars inside.
Inside the modloader.ini I left the “ New Cars ” folder with more priority than the “ Car Pack ”, so that it would be loaded “over” the Car Pack , thus “replacing” the cars in the pack with the new ones I downloaded (without changing any files!).
That's it, you get the idea, right?
If you don't organize and configure the priority of your folders within Modloader well, you will possibly see bugs like: Bug with cars, pedestrians or objects appearing white (very common), where being white means: lack of texture, which means: wrong or missing .TXD, because for example the Mod Loader loaded a .DFF from one mod but with a .TXD from another. Also like wrong textures (messy, buggy) and even you install a mod and see no effect, because another mod is “replacing” your new mod .
In addition to countless other issues, if you encounter problems with mods that replace the same file that another mod also replaces, increase the priority of one mod's folder or lower the priority of another. Or do it manually: Delete the files from one of the mods. Or even rename the folder name by putting a number in front of it to change the loading order. Or continue reading the next sections below to disable mods in modloader.ini.
Taking advantage: Car packs usually come with .cfg, .ide and .dat files, I recommend you read the “ Important ” part up there, in the “ Installing data files ” section to avoid problems with handling not loading.
Priority numbers range from 1 to 100 ; using 0 causes the folder to not be loaded. All folders have a default of "50" , so if you mark a folder with a priority of "40", it will be loaded "below" all folders in which they have no priority, since those that do not have a priority in the .ini file are considered to have a priority of "50".
Easy, right? If you don't understand something, reread it slowly.
.IgnoreFiles
Under “ [Profiles.Default.IgnoreFiles] ” you can put the names of the files you don’t want to load (thus loading the original GTA SA file.
For example:
[Profiles.Default.IgnoreFiles]
vehicle.txd
And so no vehicle.txd inside your Mod Loader will be loaded (it will use the vehicle.txd from the “models/generic” folder.
Easy, right?
.IgnoreMods
Under “ [Profiles.Default.IgnoreMods] ” you can put the names of the folders not to be loaded
For example:
[Profiles.Default.IgnoreMods]
Cars
And so the “Cars” folder will not be loaded.
Easy, right?
.IncludeMods
Below “ [Profiles.Default.IncludeMods] ” you put the name of the folders in which you want to load when using “ ExcludeAllMods = true ” in “ [Profiles.Default.Config] “, this way, all mods will not be disabled and only the mods listed below .IncludeMods will be loaded.
.ExclusiveMods
Below “ [Profiles.Default.ExclusiveMods]” you put the names of the folders in which you want to load only in the current profile, and not in the others. (I will explain about Profiles soon!)
EXTREMELY USEFUL FOR TOTAL CONVERSIONS.
Just create a profile and enter the name of the Total Conversion folder below, and you're done. This way, when you activate your profile (as mentioned earlier in this tutorial), Mod Loader will only load the folder with the total conversion. If you don't have the profile active, Mod Loader won't load the total conversion.
So you can add .ExclusiveMods and put the name of your TC folder, and put below .IncludeMods the folders you want to be loaded along with the TC.
Remember that full conversions may have files that are not compatible with Mod Loader, they usually come with .dll and .asi files that you need to delete, among other things.
For more information and explanations: Click here to see a wiki on how to install Total Conversions and see which ones are or are not compatible with it
Glob
Before talking about profiles, know that you can also use glob in modloader.ini
This creates so many, so many possibilities that it is impossible to mention everything in this post.
Click here for a (small) page on Wikipedia (Portuguese)
Click here for a (very complete) page on Wikipedia (English)
Everything listed there works in Mod Loader (except the [], for name compatibility)
Some examples to give you an idea:
[Profiles.Default.IgnoreFiles]
*.ifp
It will not load any .ifp files
[Profiles.Default.IgnoreMods]
?car
It will not load folders named “carro” or “car” or “scarface” etc.
[Profiles.Default.IgnoreMods]
example/*
It will not load files in this folder:
“modloader/something/example”
But it will load in this subfolder:
“modloader/something/example/thing”
[Profiles.Default.IgnoreMods]
example/**
(This is not listed on Wikipedia but is also supported)
“modloader/something/example/thing/something else”
It won't load the "example" folder or anything inside it. It will only load the "something" folder.
Remembering that you can use this anywhere, it doesn't need to be in “.IgnoreMods”, these were just examples.
etc etc etc etc
(great for use in SAMP or Total Conversions!)
Still in modloader.ini, you can create profiles and have several GTA in one!!
That's right, you can create sets of mods in the same GTA, great for various situations, especially total conversions or SA-MP.
Under “ [Folder.Config] ” you have “ Profile = Default “, where “ Default ” is the default profile that comes with the Mod Loader
As you can see in the .ini, you have a lot of “.Default”, like “[Profiles. Default .Priority]”, where this “Default” is the name of the profile of that configuration.
(the profile name is not case sensitive, you can for example use “default” or “DEFAULT” it doesn’t matter)
Let's use a simple example:
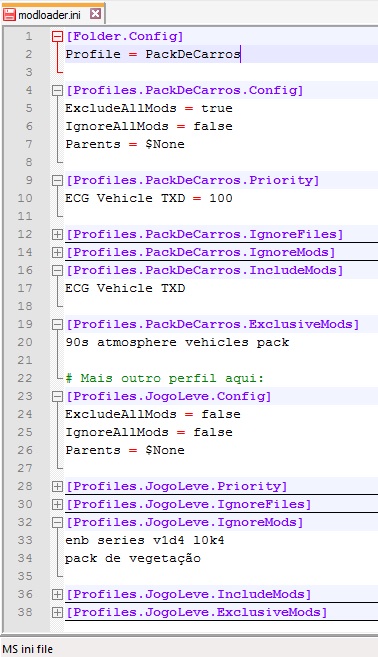
(in the print above I used Notepad++ to make it look nicer, of course, it's the same thing using Notepad)
Here I configured it to use the “ PackDeCarros ” profile , where I configured .ExcludeMods to exclude all mods from loading except “ECG Vehicle TXD” where I also increased it to priority 100 and left the “90s atmosphere vehicles pack” folder as exclusive (the folder will only be loaded in this profile).
And there in another corner I configured another profile called “ JogoLeve “, where I added settings that prevent the loading of an ENB series and a vegetation pack.
(If you haven't already read up there where the “ Modloader.ini ” section begins, read on to learn how to configure the profile!)
So, I just need to change “ Profile = PackDeCarros ” to “ Profile = JogoLeve ” up there and I will no longer have the car pack, ENB series and vegetation pack…
See? It's not difficult, just use a little reasoning and feel free.
.Profiles Folder
Another way to do this (a more organized way) is to create an .ini file inside the “modloader/.profiles” folder (the name of the .ini inside doesn’t matter, but for organization purposes it’s nice to use the same name as the profile, right?).
Inside the .ini, place the profile settings as shown in the print above ( except the part where it tells the game which profile to use, in this case “[Folder.config]”)
So, inside your “modloader/modloader.ini” put the name of the profile you want to use, normally…
In other words, the “.profile” folder is only used to organize and avoid having to put all the settings for all profiles inside modloader.ini, you choose how to do it (I prefer to use the folder).
More settings:
Below “ [Profile.ProfileName.Config] ” you can also use the “ Parent ” setting followed by the profile names separated by commas. This way, the settings from other imposed profiles will be merged into this current profile (so you don’t have to keep copying settings from other profiles).
You can use “ $Current ” for the profile currently set in modloader.ini, or $None to not use Parents.
You can also include the “ UseIfModule ” setting , where you put the name of an .exe or .dll, if it is loaded, the game will use this profile.
For example:
“UseIfModule = SAMP”

(in the print above I used Notepad++ to make it look nicer, of course, it's the same thing using Notepad)
And so when you open GTA using SAMP, it will use this profile!
And as seen, this profile will disable a car pack , use exclusively the samp graphic restore and the parent settings are taken from the “Default” profile, where I left the general settings.
(more information in “modloader/.data/Profiles.md”)
Config.ini
Located in the “modloader.data” folder
(true = enable, false = disable)
AutoRefresh | Enable/disable automatic updating of mods. (If disabled, use the reload key)
EnableLog | Enable/disable .log.
EnableMenu | Enable/disable the in-game mod menu.
EnablePlugins | Enable/disable its plugins.
ImmediateFlushLog | Enable/disable immediate flushing of the log to disk.
MaxLogSize | Maximum .log size (in Bytes)
Command lines
You can even use command lines in GTA .exe!
-mod name | Make this mod be loaded (can use multiple times)
-modprof name | Specify a profile to use.
-nomods | Disable mods
-mod name = priority | Set priority for some such mod
(more information in “modloader/.data/Command Line Arguments.md”)
Example:
Create a shortcut to your GTA .exe, place it anywhere you want (on the desktop or in the same folder as GTA, etc.)
Right -click on the shortcut , go to Properties , in the Shortcut tab , in Target you will have the path of the .exe closed with double quotes ” (if there are no quotes, put them)
Place the command line in front (after) the quotes, for example like this:
“D:DocumentsGTA San Andreasgta_sa_compact.exe” -nomods
Done, when you open this shortcut your GTA will load without any mods. (-nomods)
or else:
“D:DocumentsGTA San Andreasgta_sa_compact.exe” -modprof PackDeCarros
Which will load GTA using the “PackDeCarros” profile that I showed above
(to add multiple commands, just put them all one after the other as normal)
Cool, huh?
Tips:
This above is very cool to use in total conversions, notice, you can create a unique shortcut to open the game with the total conversion!
I've done something like this before, creating a shortcut configured to open "without mods" (loading only the necessary mods like Widescreen Fix and Improved Fastloader ) and including a dedicated folder where the mods would be loaded. This way, when a mod didn't work in the game with multiple mods, I'd install the mod in that folder and open the game through that configured shortcut. I'd test it, see if it worked, go back and find out which mod caused the incompatibility, etc. It was very useful for testing mods to post on the blog.


No comments